Tuning a sonotrode is the process of bringing its resonant frequency towards a target frequency. Physically that's usually done by an iterative process:
- Measure resonant frequency
- Machine the part (typically reducing it's length)
- Measure frequency again - is it close enough to the target?
- Repeat from (2) until it is.
The process in software is not very different but it does have some advantages, notably the "machining" process is quicker and cheaper, and it's much easier to put material back on!
SonoAnalyzer version 3 aims to make this process as easy as possible through the use of User Variables.
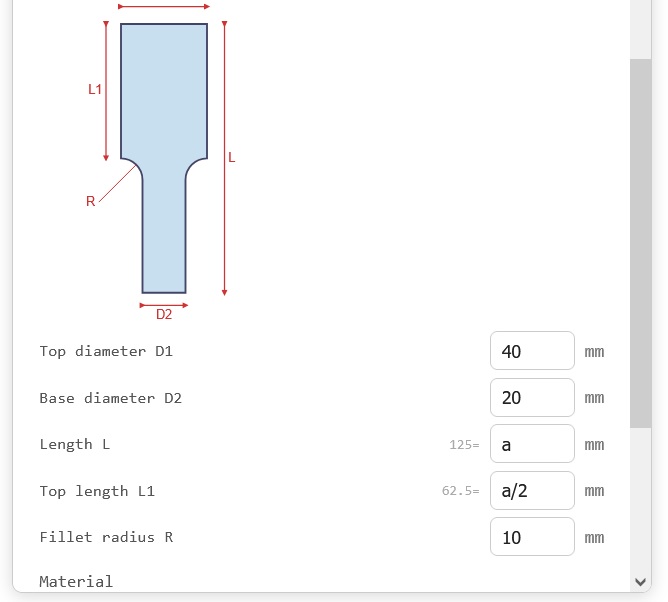
In the Geometry tab, wherever you would usually enter a numeric value, just enter a letter from a to e instead.
Simple expressions are also allowed (2*a, a+b etc.) so related dimensions can be automatically adjusted. Here we set "a" as the length and "a/2" as the top length so the step is always positioned at exactly half of the total length.
You'll see a value appear to the left of the input field, most likely zero initially. That value comes from the User Variables section of the Analysis tab, which also gives you the opportunity to set the minimum and maximum possible values for the variable.
Try to set a realistic range - in most cases there are physical limits on the geometry that you will want to stay within. Tip: It's generally a good idea to run the analysis at both ends of the scale to check that nothing unusual happens. For simple sonotrodes like this there isn't usually a problem but on larger designs like slotted blocks you may find that there are several modes close to the target and the pattern can change from one end of the range to the other. If that happens you will need to reduce the range.
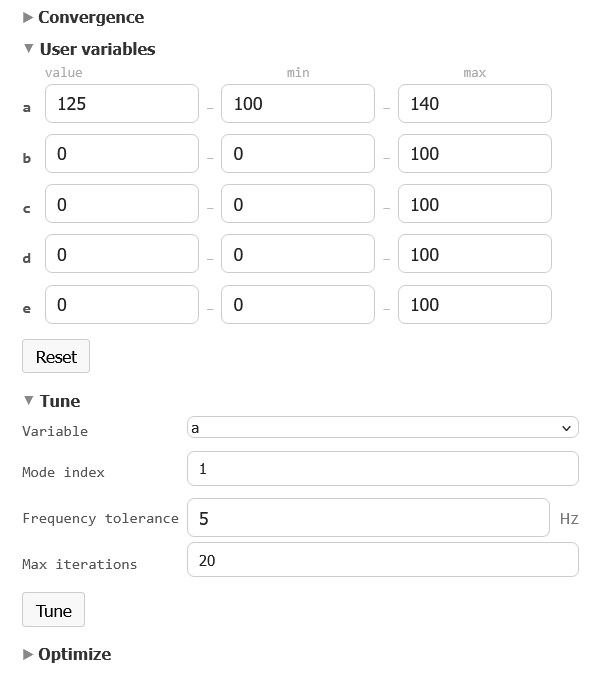
Here are the User variables and Tune sections of the Analysis tab. (Just click on the title to see them if the panel is closed). The value of "a" (sonotrode length) is set to 125mm with a range from 100mm to 140mm.
In the Tune panel you can usually leave everything at the defaults but the Mode index input is worth noting. If you're interested in the first axial mode of vibration (generally true for half-wavelength sonotrodes) then enter 1 here. If you're building a full wavelength sonotrode then you'll need 2 here. For verification, run the analysis and check the Results tab. In the frequency selector at the top you'll see something like "20298 Hz (Axial 1)" - this is the calculated frequency along with SonoAnalyzer's evaluated mode type (Axial) and the mode index (1).
So with the setup done we can start the tuning process. Just click on the Tune button. If you've followed the advice above and already run the analysis at both ends of the range then the tuning process will immediately find those results and note their frequencies, completing the first two rows in a flash. If not the analysis will start up in the background - be patient and wait for the results to come in.
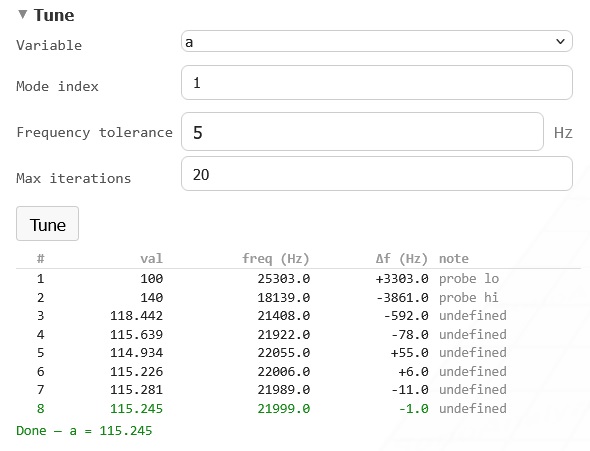
Several minutes later... This is how a complete tuning run looks. Each line in the table corresponds to an analysis run. If the process completed successfully the bottom line will be the tuned dimension, shown in green.
Summary
We've covered why tuning is necessary and how to use SonoAnalyzer v3 to automatically tune a simple sonotrode by length.
But what about more complex designs imported as STEP files? There are no length dimensions available to SonoAnalyzer - they can be changed in CAD but when you export to STEP the values are all baked into the file. That will be the subject of another post, coming soon...